Showing posts with label gasket. Show all posts

Thursday, November 15, 2012

DIY 91 - 94 Tercel Down Pipe/Manifold Replacement

 This is a DIY on a down pipe for a Tercel but while doing this DIY I ran into problems with the exhaust manifold and replaced the gasket and studs .


Make sure when your doing this job you have the car as high as you can safely on jack stands .


Always remember to make sure the one you are replacing is the same as the one you took off .


First you start off by removing the plug for the oxygen sensor then remove the two studs from the down pipe to the exhaust manifold .


This case replacing the nuts and bolts is the best way so I cut them off remembering when putting this back on you put these back on the same way you took them off these keep the pipe from shaking and rattling .


Then you put the oxygen sensor back on the down pipe .


Now when removing the exhaust manifold you must remove the intake and heat shield then you remove the six nuts holding the exhaust manifold .


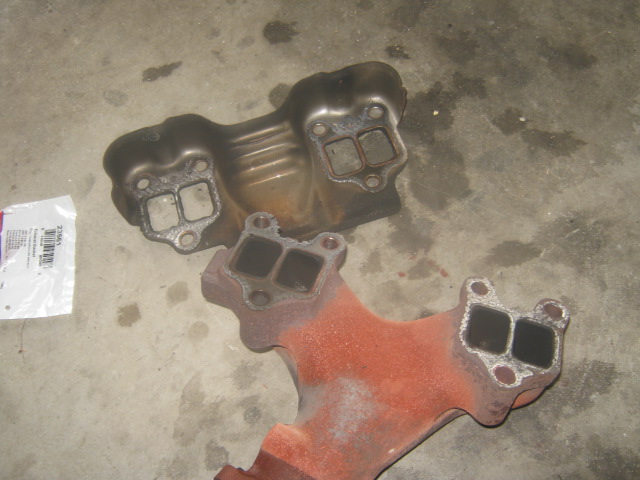

Remember there is a heat shield that you must put back and the exhaust manifold gasket goes inside the heat shield when you are putting the manifold back .


In my case my two way studs were stripped so I replaced them . This is a very easy thing to do make sure you check for damage threads to the manifold .  DO NOT USE A VISE GRIP WHEN PUTTING THIS BACK ON  . Hand tight once you tighten the down pipe to it the nut will tighten the rest .


Again make sure you have the heat shield first then the manifold gasket then the manifold in that order , Some people use a light coat of red exhaust manifold silicone for help or if you have headers sometimes it is best to use it because of the higher heat on the gasket will eat it .


Then remembering to use the donut gasket that goes on the down pipe upper and lower ends again if you choose to use a light coat of the red silicone you can but when you tighten down on the pipes and manifold the gaskets will crush into place .

Now there was a bracket that held the pipe by the oil pan mounted to the block . If your down pipe doesn't come with one then use a metal clamp and clamp the pipe to the bracket as in photo .


Remember to return everything back then start your vehicle and carefully check for leaks , You will see alot of smoke coming off the exhaust manifold that is the gasket molding into place .


More info @ www.CorollaCarClub.proboards.com or http://rinconrolla98.blogspot.com


.

Friday, October 19, 2012

DIY - Tercel 91 - 94 Valve Cover Gasket Replacement

This DIY is on a 1993 Toyota Tercel with a 1.5L FI SOHC 4cyl , 3E - E .
 

This is the Valve Cover gasket with Grommets . Best thing to do before you start this job is to power wash your motor especially if you have a leak in your valve cover and want to make sure you have correctly fixed it .


First thing I did was remove the PCV valve hose to the valve cover then I removed the two nuts holding down the valve cover .


Once you remove the two nuts with a flat head screw driver gently lift up the valve cover till the grommets come up then remove the grommets then you can remove the valve cover or you can remove the intake hose going to the intake to make it easier when you put the valve cover on .


As you see in the top photo how much better clearance you have with the intake hose off . In my case my valve cover was rusted and nasty looking so put a rag that is dirt and lint free so if any wind doesn't blow dust or sand in your cam shaft area . Then you can clean up your valve cover from grease and clean the area on the head from grease . In my case I repainted my valve cover .


Once you finish painting or degreasing your valve cover you can add a little of gasket maker silicone inside the valve cover . Some people use the gasket maker some don't its your vehicle you decide how you do it in my case I used it . Once you apply it on then you put the valve cover gasket in the groove and gently press on in flat then find a clean surface to rest the valve cover on for about a minute or two so that the valve cover can get tacky and lay flat .


Once you have waited in my case I added just a little of the gasket maker on the bottom of the gasket again its your car if you want to or not is fine . Then you hand add the NEW grommets - DO NOT USE THE OLD GROMMETS because once they have been used they are no good any more because the squeeze flat . Then you hand tight the two nuts go side to side so that it lays flat then you hand tight till the nut stops and the grommets are pushing the valve cover flat . Then you put every thing back into place .


Let your valve cover sit for about five minutes while your cleaning up your area then you can start your vehicle and look for leaks . Wait about a week or two weeks then just check lightly that your two nuts on the grommets are still secure plus the rubber shrinks after it is heated .
 
 
More information or help you can contact me at www.CorollaCarClub.proboards.com .