Monday, August 16, 2010

DIY Brake Master Cylinder Corolla 93 - 97

This DIY is for the Brake Master Cylinder only .


As you can see some Brake Master Cylinder come with the plastic container and some don't . In a situation where you don't then you reuse the same container . There is a small phillips screw holding it in place .


First thing you do is to remove the brake lines from the master cylinder .


Then you unplug the brake light warning switch plug .


Then you can remove the 3 nuts holding the master cylinder to the power booster and there you have it , You have removed the master cylinder . Then after bench bleeding you can put it back on the same way you took it off . If necessary you can bleed the lines so that you have new brake fluid and secure you don't have any air in the lines .


Bench bleeding is simple . Your master cylinder comes with the parts to bleed it . If you don't have a bench you can attach it back to the power booster and have some one inside the vehicle slightly pressing on the brakes till you don't see it bubbling anymore . Master cylinder comes with bench bleeding instructions so put them in a area where the paper won't get brake fluid on it .

Friday, August 13, 2010

DIY Power Brake Booster Corolla 93 - 97

This DIY is for the Power Brake Booster only . Before you do this it is best that you disconnect the battery cause one you disconnect the brake pedal from the Power Brake Booster your brake lights will go on and kill the battery . You can use something to keep the pedal up but it takes 5 seconds to disconnect the battery .

If you have a cold air intake or the air filter box remove that first .


If you have a upper bar remove that or the one side so you lift it up and out of your way .


My car has a fuel air canister and if yours does then remove that too . The more you remove the better working area you will have .


The next thing to do is remove the brake master cylinder lines . But in my situation I didn't have to remove the master cylinder lines at all I just pulled the whole master cylinder forward .


Then remove the hose that connects to the power brake booster . Make sure you put this back on when you put the other one on .


Then you can remove the 3 nuts that hold the master cylinder to the power brake booster .


If you disconnected the lines keep the master cylinder standing up and place it somewhere it won't tip over . If you didn't remove the lines just pull the master cylinder forward and be careful you don't kink the lines or brake them .


If your car has the A/C duck for in between your legs then remove that piece .


Right by the brake pedal you remove the 4 nuts holding the power brake booster to the firewall .


There is a pin and a spring that you have to remove also . Once you have that all disconnected then you can go back to the front and pull the brake booster out . Then when you put the new one in you just do it in the reverse . If you disconnected the master cylinder make sure you bleed it correctly . If you didn't disconnect your battery put something behind the pedal .


Reminder before you put the brake booster back in you have to loosen the nut so that you can adjust it to the brake pedal . Very important it matches your brake lights so that the lights don't come on to early or to late then causing a accident . Once you have completed this then you can tighten the nut back . You can adjust your brakes by using a needle nose pliers twisting the ridged area so that the handle moves forward .

Sunday, July 25, 2010

DIY Stand Out Toyota Logo

Now the stand out Toyota Logo.......you will need a photo copy of the Logo...I got mine from the internet, also x-acto knife, foamies sheet that you can get at Michael's, spray adhesive, some fabric and a lot of patience...

First print out logo......and tape over the first foam sheet....then cut. You should get the first Logo. Once done glue it on top of the second sheet and cut outer part.


Once done cut fabric to specific measurement ....put some glue on Logo and glue fabric over and give the shape to fabric


And there you have it . You can do it in any way you want this was just to show you how it looks .

Saturday, July 24, 2010

DIY Polishing Aluminum Engine Parts To a Mirror Finish

Here you go guys another DIY..this one is not mine but I've done rims using the same technique. Since the engine bay is hot you might want to spray some high temp or rims clear coat to prevent it from dulling out.

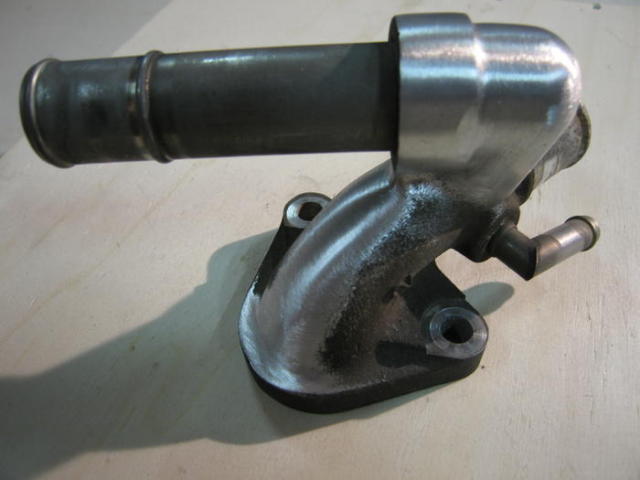
We start with the standard piece, in this case it's the coolant neck of a Gen3 3S-GTE engine.


The first step is the most time consuming and important phase. The amount of work and detail you're prepared to bring into this phase determines how well it'll look in the end.

To get the part to a smooth, mirror-shine finish we need to smoothen the surface of the part. Since this aluminum part is cast, the cast structure needs to be leveled. Aluminum is very soft and this can be achieved by hand-sanding the structure down with grit 80 sanding paper:


I'm using a cork sanding block, which isn't too large and gives in a little. A hard, plastic sanding block wouldn't work as well because it's not flexible, making it much harder to sand curved surfaces.

After the first stroke, this problem area becomes visible:


The top is not completely round but has a weird shape. You could leave it like this, but as I said, this stage determines how well the finished piece will look. So I want this removed to create a nice round shape instead of what it is now. I use a big metal file to level the high areas. This is the result:


I also filed down the casting seams at the top:


The rest of the shapes were okay, these just required sanding. Do as much as you can with the sanding block, because you can easily apply pressure on it, making the work much easier. Also, when not using a tool like a block, you're bound to create waves in the soft material, which will show once it's completed. Compare it to body filler: you need the sanding block to create a tight, planar surface. If you'd sand the filler by hand, you'd create a warped surface.

After sanding more:


Here I filed away the ongoing casting seam with the same file:


The file leaves pretty heavy scratches. 80 Grit sandpaper deals with it though:


A bit further down, there's a small '2' cast into the piece.


I used a miniature file to get rid of it:


I used the large metal file again to level this:


You can see how much material was removed by looking at the blank material. After more sanding, sanding and sanding, stage1 was completed.


TIME NEEDED TO COMPLETE 80GRIT SANDING: 6-7 HOURS

The next stages are considerably shorter, and easier. 120 Grit sandpaper is up!


In this picture, the top part has been sanded down with 120 grit, the rest is still 80. The idea is, that every scratch you made with the 80 grit sanding paper must be removed by the 120 grit. If you don't, you'll see it throughout the remaining stages!


Here, the piece is complete done.


TIME NEEDED TO COMPLETE 120GRIT SANDING: 1.5 HOURS.

The next stage is 220 grit sanding. Again, you should sand away all the sanding marks left by the 120 grit stage. All done:


TIME NEEDED TO COMPLETE 220GRIT SANDING: 1 HOUR.

The next phase it 400. This is where it gets tricky, because this is one of the highest grits you can still dry-sand. Wipe off the paper often, because it tends to fill up with aluminum dust very quickly.


As you can see, the piece gets shinier by the hour!

TIME NEEDED TO COMPLETE 400GRIT SANDING: 1 HOUR.

Now we move to wet sanding. Get a bucket of warm water and throw in some pieces of 1200 grit sanding paper. You might also get an old towel, fold it four times, and lay it on your lap. I found this greatly helps in not getting my lap soaking wet.


Also, note that at this point, sanding can be done by hand for most parts. You're not altering the shape of the piece any more, you're just refining the texture of the aluminum. Some parts may still be easier to do with a block or rubber, but hand-sanding will get you into all the tight areas.

TIME NEEDED TO COMPLETE 1200GRIT WET-SANDING: 45 MINUTES.

The last sanding step is 2500 grit. Again, this can be done by hand to save time. Finished piece:


TIME NEEDED TO COMPLETE 2500GRIT WET-SANDING: 45 MINUTES.

Now it's time for the topping on the ice! Get yourself a hard cotton/cloth polishing disc with polishing paste (usually a hard bar), and mount it on a drill.


Use this to polish the piece to the mirror-shine you always dreamed of!


TIME NEEDED TO COMPLETE MACHINE POLISHING: 15 MINUTES.

Friday, July 23, 2010

DIY AE86 Strut Assembly into TE72 With Coil Overs

NOTE: Paradise Racing also sells the coil over kit for TE72 I just wanted to go with AE86 strut assembly in case I wanted to go cheap and use lowering springs; so it is up to you but the steps will work for either one of them.

Things needed:

AE 86 Strut insert refill (autozone)
AE 86 Strut Assembly (junkyard)
AE 86 Calipers and Pads (junkyard)
AE 86 Drilled and Slotted Brake Disk (optional)(ebay)
Paint
Primer
Drill
Wire Brush for drill (3 different sizes is better) (Dollar Store or Walmart)
Bearing Grease (autozone)
AE 86 Coilover kit (paradise racing)

Tools Needed

12mm socket
14mm socket
17mm socket
19mm socket
21mm socket
Electric or pneumatic impact wrench
hammer
flat tip screwdriver
10mm wrench
8mm wrench
Vice grip
hydraulic jack
jack stand
ratchet
diagonal cotters
breaker bar
pry bar
empty container or bucket
vice
big pliers

Steps

First of all I started with a rusted off strut assembly so it was time to clean the corrosion, primer and paint all parts. Before this; it is better if you take it completely apart. You will need the 14mm socket to take the calipers off the assembly. Also the 12mm socket to take the caliper apart. You will also need a bucket, big pliers, and a vice to take apart the strut insert. Don't tightened the strut too tight in the vice since it will damage the cylinder...just enough to remove the nut. Now remove the brake disk by removing the grease cover at the front with a flat tip and hammer. Use the diagonal cutters to remove the cotter pin. Now remove the nut follow by the bearings and brake disk assembly. If you are to replace the disk use the 14 mm to remove 4 bolts on the back of disk assembly to remove disk from assembly. Also remove the brake disk backing plate from strut assembly by removing 4 bolts. Once everything is apart clean, primer and paint all parts.


Now just assemble everything the same way you took it apart. Now it is time to order your parts and be jumpy every time the door bell rings...lol. The first thing I got was the coil over kit from paradise racing. The way you set them up is fairly easy. First the treated sleeve and the locking nut and the adjustment nut on top(the one with Allen key bolt), follow by the locking ring, then your spring. Next one will be your top part or hat. Use the zip thighs out of the kit to keep the hat and spring together and pit the cotter pin/locking pin into hat. Then use the second upper cover out of your AE86 strut assembly. The one with bolts that goes attached to the frame from the ae86 will not be used, you will use the one out of your TE72. Check out pics to learn how to set it up.


Now it is time to get the old ones out and the new ones in. First raise the front end of car up and put it on jack stands. Using the 21mm socket remove front tires. Then open hood and take strut assembly center nut cover out(that is the one on top of each strut assembly under the hood). Now use your impact wrench and 19mm socket to remove the strut assembly main bolt(you may have to use the vice grip to prevent the strut insert/piston to rotate during removal). Your upper hat from the TE72 strut assembly will stay attached to the car. Now use your 10mm wrench to removed the brake line and put empty container under it to recover the brake fluid. Once removed, use a flat tip and hammer to take out the locking pin/latch that holds the line in place out. Now use your 17mm socket and breaker bar to remove 2 bolts under strut assembly the ones holding it to the lower plate. At this time your strut assembly will be loose and all you need to do is pry it out and/or step on lower plate to make room for assembly to come out. Now remove the old assembly and install the new one the same way you removed the old one. Make sure both side are adjusted the same way. Install both tires and lower car. Now remember to bleed the brake system and your done. Take it for a spin and bring it back. Now do final adjustments, so lower or raise and you are done.


Now enjoy your new coil overs and your new look....hope you enjoy and got something out of this DIY .