Sunday, September 23, 2018

DIY - Trailer WIre Kit installation 2009 Toyota Rav4

This is for a 2009 Toyota Rav4 Trailer Installation Kit .
Part #118412


Removing all the carpets and trunk area to freely install the wire kit - Then you start with the back of the plastic protector 


Removing the bolts and screws on the side panel then gently pull away from the vehicle - This way when you wire up you can cross the brake light wires from left to right 


On each side you can add the center connector - Remove the plug then re plug into the by pass wires 


As you make sure that the box is on the driver side of the vehicle - Tuck and hide your wires then you will see a rubber plug and slice a hole it in to that when you wire up to the battery that will be your access hole . 


Ground your wires and crimp the main wire then start sliding all your wiring in the hole that you removed the plugged from 


Now travel down the driver side of the frame and tie strap the wire making it safe from falling or rubbing on anything - Take your time 


Then with the fuse you need to cut it in the middle again hide wire - crimp your hook then connect it to the positive side of the battery 


Once you have everything wired up and secured then you can put everything back - Use Dielectric Grease for your plug - Wrap it up securely so it doesn't rub then test wire to trailer . 


More DIY @ www.corollacarclub.proboards.com 


.

DIY - Yellow Vinyl Wrap Fog Light 2009 Toyota Rav4

This DIY in on a 2009 Toyota Rav4 but you can do this to any vehicle 


To remove to chrome trim around your fog light all you have to do is put a screw driver behind and pull forward lightly you will see 4 clips holding it - Once removed clean area and lens up . 


Once you measure then you can cut a small piece of vinyl - You can do this without removing the fog light assembly - Gently push the vinyl over the lens if heat gun is needed then use it if you have sun let vinyl sit in the sun for a few minutes to soften .  


With a sharp blade you can trim up the area around the lens then with a plastic tool gently remove all the air out of the vinyl then you can put everything back together . 


There you have it a JDM look .


More DIY @ www.corollacarclub.proboards.com


.

Sunday, September 2, 2018

DIY - 2005 Corolla Rear Brake Shoes Replacement

This DIY is for a 2005 Toyota Corolla Altis made for the USA - NOT JAPAN 


Make sure you check your vin if it starts with a J then it is a Japan Model If it starts with a T then it was made in Canada or US so brake shoes are different sizes in the rear .


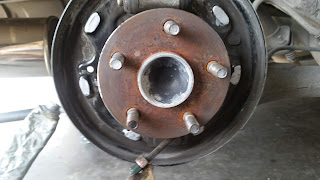
Always good to do one side at a time just in case you forget how to put it back or take pictures as I did . But if you first remove the brake adjusting spring .


Then you can remove the lower spring and the side springs holding the shoes up . 


Then you have the inner top spring to remove then the emergency brake cable clip 


With your new brake shoes make sure you size them up and know which is the inside slot and the outside slots .


Using Anti Seize you will apply a little on the brake plate where the shoes will be rubbing - DO NOT USE GREASE - Of course check for leaks around the brake wheel cylinders and clean dust with brake cleaner wear a mask .

Put clip back on new brake shoe for the emergency brake cable then apply anti seize on brake adjuster to keep from freezing especially cars up north . 


Make sure you notice the slots on the brake adjuster 


Once you have your new shoes on then you can adjust the brakes 


Either from the rear or keep pulling the drum off till you feel a slight drag . If you do it from the rear make sure you put the rubber plug back . 


If you wish to bleed the brake system then you can if not then carry on 


More DIY @ www.corollacarclub.proboards.com 


.