Showing posts with label home depot. Show all posts

Friday, June 8, 2012

DIY - Plasti DIP Your Emblem and Front Grille


 This is a basic DIY on Plasti Dip Emblem and Grille on any vehicle with out removing the emblems , This one I did on my 1993 Corolla . I purchased this can from Home Depot .


Make sure before you mask off your area that you clean the area with Windex or alcohol to remove any dirt , grease or wetness . If you want to mask off more of the area you can but this comes off easily if over spray exceeded the area of masking .


What I did was gave it four coats of plasti dip , Every 30 minutes . You can add more if you want or wait 1 hour if you want before respraying . Make sure it's not humid outside or raining where moisture can be present . At first when you spray it you will think it looks funny or odd or doesn't look even , Do not be alarmed that's the way it will look until it completely dries . You will see improvement when you respray after 30 minutes .


 After you sprayed your coats then you wait about 1 hour or more depending on how much time you can work on this make sure that there is no contact between the emblem and plasti dip and with a tooth pick pull up on a corner and peel away . If you see it lifting up on the emblem keep a sharp razor to cut slightly not damaging your paint but usually the emblem is away from the vehicle leaving you a gap . But the more you over spray the more build up but when it dries it will shrink or should have shrunk by then .


Now where the center garnish or the front grille in my case I wanted the chrome to show on the grille with a sharp razor blade you trace the area you want to remove . Same as the garnish . Do not remove the tape around the garnish until you have cut out the letters cause  you will pull it off if you lift up cause there is no gap separating the plasti dip . As you are lifting gently push down on the area you want kept black especially if you slightly lifted off the are you want to keep the plasti dip on .


Once you are completed then with a moist wash cloth do not wet completely just a tiny bit wet and rub out any unwanted over spray you wish to remove . Do not go over what you painted cause it still needs around 4 hours to cure plus once it gets into the sun it will cure again so wait about a day to be sure if not then do as you wish . Your results will look like this . In the future you wish to remove it you can remove it with a power washer or peeling . They say this last about a year of  environment conditions . May last longer .

For questions needing to be answered you can contact me at www.corollacarclub.proboards.com

Wednesday, November 30, 2011

DIY - Home Depot Lip

Well, here it is...


Took me about 30 minutes to do, and that was with the car on the ground. It would probably be easier if it were jacked up some and on jack stands...

Tools and Materials:

10mm Socket and Ratchet

Pointy Screwdriver (Or drill)

Wire Cutters

Scissors

Zip Ties

3M Outdoor double sided tape

Garage Door Bottom (I got it in a 12 foot roll. Only need about 7-8 feet)


Directions:


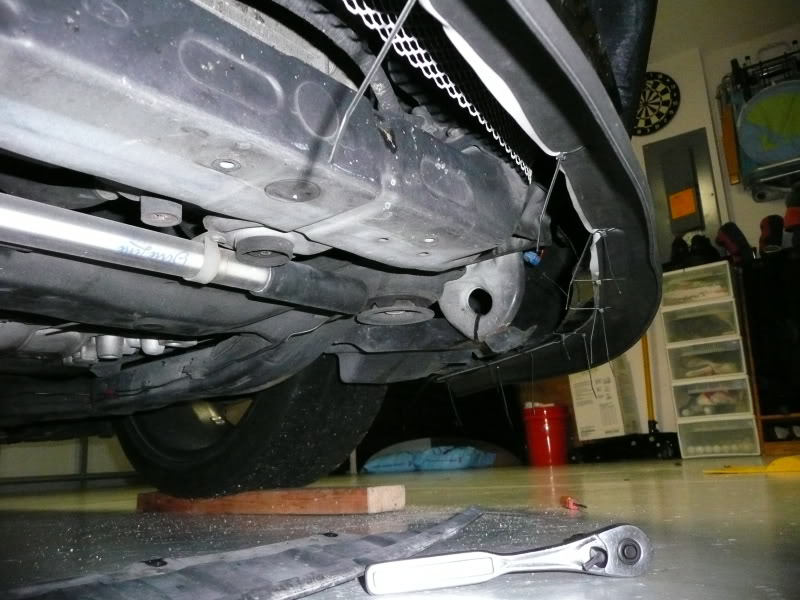
 First, you'll need to remove the radiator guard under the car. You can do this by taking out the 5 bolts pictured below.


Once you have that off, lay out the Garage Door Bottom along the bumper on the ground.


Take the double sided tape, and stick it along the edge of the garage door bottom. I left a little gap from the edge so it would be less noticeable...


 Now, hold the lip up to the bumper, and decide where you'd like it to be placed. Whether you like it recessed in a little, or on the edge. I went for a middle ground with it...


Next, stick it onto the bottom of the bumper. I found out that once you stick it on the bumper, it doesn't like to be taken back off. So get it right the first time :p


Next, keep unrolling the tape along the garage door bottom as you go around the bumper.


Then, work your way around the bumper. Make sure to take your time, checking the spacing to make sure it's even. If it's not, it WILL be noticeable. When going around any curves, make sure to push the lip into the corners so it sits flush with the bottom of the bumper. If you don't, you'll have a hard time getting it to curve with the bumper.


Then, once you worked your way all the way around, using scissors, cut off the excess garage door bottom.


Now, I clamped the edges to make sure the lip wouldn't start to come off while I secured it in place. Then, I took my pointed screwdriver and just pushed it through the lip, and the bottom of the bumper.


 Once I did that, I just fed through a zip tie.


 After that, pull the zip tie tight, and make sure it is secured as this will be the main thing holding the lip on. Once you've done that, move down about 4-5 inches, and make another hole, feed through the ziptie, and pull it tight. Repeat this as you work your way around the bumper.


When you get to a corner or spot where you have to keep the lip pressed up against the bumper, use a few zip ties to make sure it stays tight along the bottom of the bumper.


Now, take those wire cutters and snip off the extra stems on the zip ties to clean it up a bit...


Now, replace your radiator guard that you took off in the beginning by putting those 5 bolts back in, and you're all done!


Pictures of the final product...