Thursday, May 17, 2012

DIY - Basic Metal Brake Line Bending & Replacement

This is just a basic metal brake line replacement DIY to help you in case your brake line , fuel line or A/C line break by the nut and it needs a full replacement . They do not sell these lines preshape unless through dealership if manufacture specification call for it or else they come straight . Always remember to measure your line and purchase a slight longer because of bending shrinks the size .                     


All you need is a mini bending tube tool but they do sell other ones . Make sure you bring your line with the ends because there are different sizes and there is no real way to search your vehicles in a auto parts store , The lines are sold as individuals .


In this case it was the brake line to the rubber line and the wheel cylinder . Once you remove the brake line cap it off so it stops leaking and that air doesn't settle in and create moister , because brake fluid should not be expose to air because it will contaminate it and ruin the inside of your brake system .


There are many ways you can use this tool , Even the inside circle can be use to bend around tight corners .


You can do two ways of bending your lines you can try to copy the exact line while its out or in my case I decided to free hand it and  make it where it better suited me . Because sometimes if you re modify it you can put it where its not rubbing in anything or out of the way so when you come back to repair something its not in your way . What I did was I copied the first bend coming from the tightest area where the wheel cylinder is .


I screwed in the wheel cylinder side and by eye I made a mental route of how I would like the brake line to follow . I would put the wheel cylinder side on take it off to bend put it back and take it off to re bend . You can bend with the one side connected but if you have time and are not in a rush its better to do it right cause the objective is not to kink the line you have to have even flow by bending .


Make sure before you put the line back on that you blow air through the line to remove any dirt before you finally tighten it down . Once you completed the brake line you must bleed the line until all the air comes out and you must do a full recycle of fluid because the air can be near the proportional valve . Then if you want might as well bleed the whole system .

Wednesday, March 14, 2012

DIY - Basic Stereo Swap

This is a basic stereo installation but this was done on my 98 Corolla .


Purchasing the stereo kit is way easier then to cut wires to your old stereo just in case you like to put your old one back .


Basically remove the cover with a flat head screw driver then unplug all the wires from the hazard and clock , Then unscrew the stereo then unclipping the stock wire harness .


This year Corolla as many you don't need a stereo installation kit you can use the side ones off the stock stereo .


Once you finish then put everything back together it's as simple as that , Follow all the directions for wiring it's not hard to do the only reason I put the pink wire on the side is cause this is a DVD stereo and that's the emergency brake wire so that the DVD will play while your driving . It's illegal to drive with a video playing .

More info on WWW.corollacarclub.proboards.com

Wednesday, November 30, 2011

DIY - Home Depot Lip

Well, here it is...


Took me about 30 minutes to do, and that was with the car on the ground. It would probably be easier if it were jacked up some and on jack stands...

Tools and Materials:

10mm Socket and Ratchet

Pointy Screwdriver (Or drill)

Wire Cutters

Scissors

Zip Ties

3M Outdoor double sided tape

Garage Door Bottom (I got it in a 12 foot roll. Only need about 7-8 feet)


Directions:


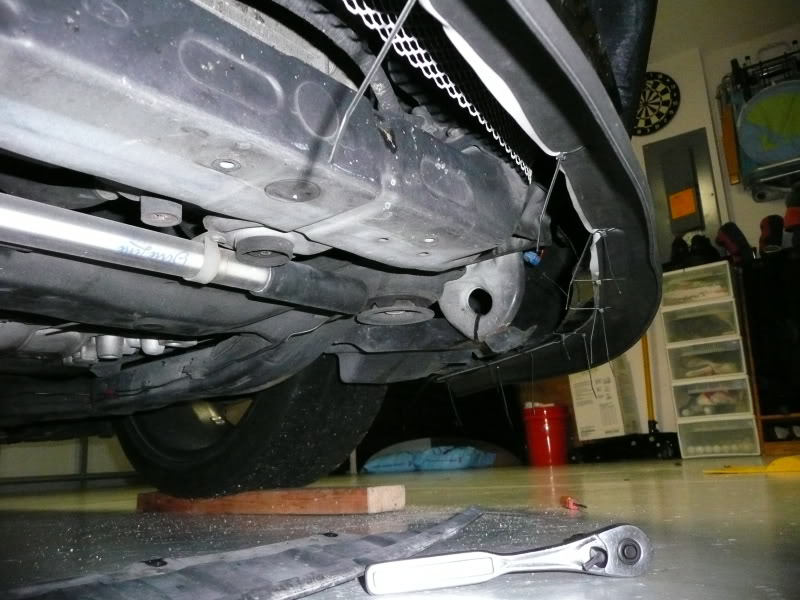
 First, you'll need to remove the radiator guard under the car. You can do this by taking out the 5 bolts pictured below.


Once you have that off, lay out the Garage Door Bottom along the bumper on the ground.


Take the double sided tape, and stick it along the edge of the garage door bottom. I left a little gap from the edge so it would be less noticeable...


 Now, hold the lip up to the bumper, and decide where you'd like it to be placed. Whether you like it recessed in a little, or on the edge. I went for a middle ground with it...


Next, stick it onto the bottom of the bumper. I found out that once you stick it on the bumper, it doesn't like to be taken back off. So get it right the first time :p


Next, keep unrolling the tape along the garage door bottom as you go around the bumper.


Then, work your way around the bumper. Make sure to take your time, checking the spacing to make sure it's even. If it's not, it WILL be noticeable. When going around any curves, make sure to push the lip into the corners so it sits flush with the bottom of the bumper. If you don't, you'll have a hard time getting it to curve with the bumper.


Then, once you worked your way all the way around, using scissors, cut off the excess garage door bottom.


Now, I clamped the edges to make sure the lip wouldn't start to come off while I secured it in place. Then, I took my pointed screwdriver and just pushed it through the lip, and the bottom of the bumper.


 Once I did that, I just fed through a zip tie.


 After that, pull the zip tie tight, and make sure it is secured as this will be the main thing holding the lip on. Once you've done that, move down about 4-5 inches, and make another hole, feed through the ziptie, and pull it tight. Repeat this as you work your way around the bumper.


When you get to a corner or spot where you have to keep the lip pressed up against the bumper, use a few zip ties to make sure it stays tight along the bottom of the bumper.


Now, take those wire cutters and snip off the extra stems on the zip ties to clean it up a bit...


Now, replace your radiator guard that you took off in the beginning by putting those 5 bolts back in, and you're all done!


Pictures of the final product...


Tuesday, November 29, 2011

DIY - Corolla Fender Liner 98 - 02

 This is a DIY for a Corolla fender liner . A reminder that a Corolla 98 - 99 are different from a 00 - 02 so before you order make sure you have purchased the correct one .

All you would need is a flat head screw driver and a ratchet 10mm . This DIY takes about 5 minutes with out taking the tire off all you need to do is raise the car up till the tire comes off the ground a little .

As you can see in the photo above my old one was broken .


 The purpose of the fender liner is to keep rocks , salt , snow, water to ruin the wires under the fender or in my case to protect my HID box .


With the ratchet you remove the 3 bolts one is by the tow hook in the front and the others are spread center and back , then with your flat head you pop out the other push fasteners , If necessary you can purchase the push fasteners at Auto Zone just make sure you have the correct size sometimes these will break of you would need a pliers to help you pull them out .

Once you remove the liner then you do it in reverse and make sure the liner is nice and tight .


These photos about is the new fender liner and how it should look when it is all done .

More DIY at : http://www.corollacarlcub.proboards.com/