This is a
DIY on any car battery with top post .

This is basically the stuff I use when I do maintenance on my own battery . Everyone has
their own methods this is mine .

This is how my battery looked with corrosion and acid all over the tops and post .

First I sprayed the battery cleaner and die spray . The red shows all the acid . Once you spray this you let it sit and eat up the acid . If you need to apply more then apply more . Always remember to use gloves cause the acid will eat your skin and sting a little . Wear eye protective glass . Never blow the acid , Always use a rag your not gonna reuse again then throw away .

Once you have wiped off all the cleaner and as much as acid you can , Then with your battery cleaner tool that has a wire brush inside you clean your top post . If you do not have this tool you can use sand paper or a wire brush .

Then you open the top of the battery cleaner tool and wire brush the inside of your battery terminals and then the outside of the terminals removing all the acid . Again if you don't have this tool you can use sand
paper or a wire brush .

Once you have all the terminals and post clean you wipe down your battery . Check your fluid levels . Do Not Over Flow . You battery does boil when it is hot and if you over flow then every thing you have done has gone to waste . Once everything is clean you add what I call are pads to absorb any acid that the battery may boil out . This keeps the terminals a little protected .

I
usually use the battery
protectant lube & spray that they give you at the parts store . But it's your car battery and you do what you think is needed. Once you bolt down your battery terminals then you spray or add the battery
protectant .
Some of the newer cars require you stick a 9v battery plug in your lighter to k
eep the computer from resetting itself . Make sure your vehicle doesn't need that or else you will be calling the dealership to reprogram your car . Some cars will not start. Some cars go into a
dum mode and will sound horrible until it relearns itself .
Make sure you consult your manual first . For older cars you are
ok to do this method .
 First thing you do is you carefully remove your spark plug wires , If there not numbered then number them or lay them in order as you take them off.
 While your wires are off you can remove your PCV which is located above the ignition coil on the right side of your valve cover . To test the PCV you shake it and if it rattles freely then your PCV is ok if it doesn't rattle freely then it is clogged .
 With a extension and a spark plug socket you remove all the spark plugs . Make sure before you remove your spark plugs it is free from dirt or liquids so that when the whole is open nothing drops in your cylinders .
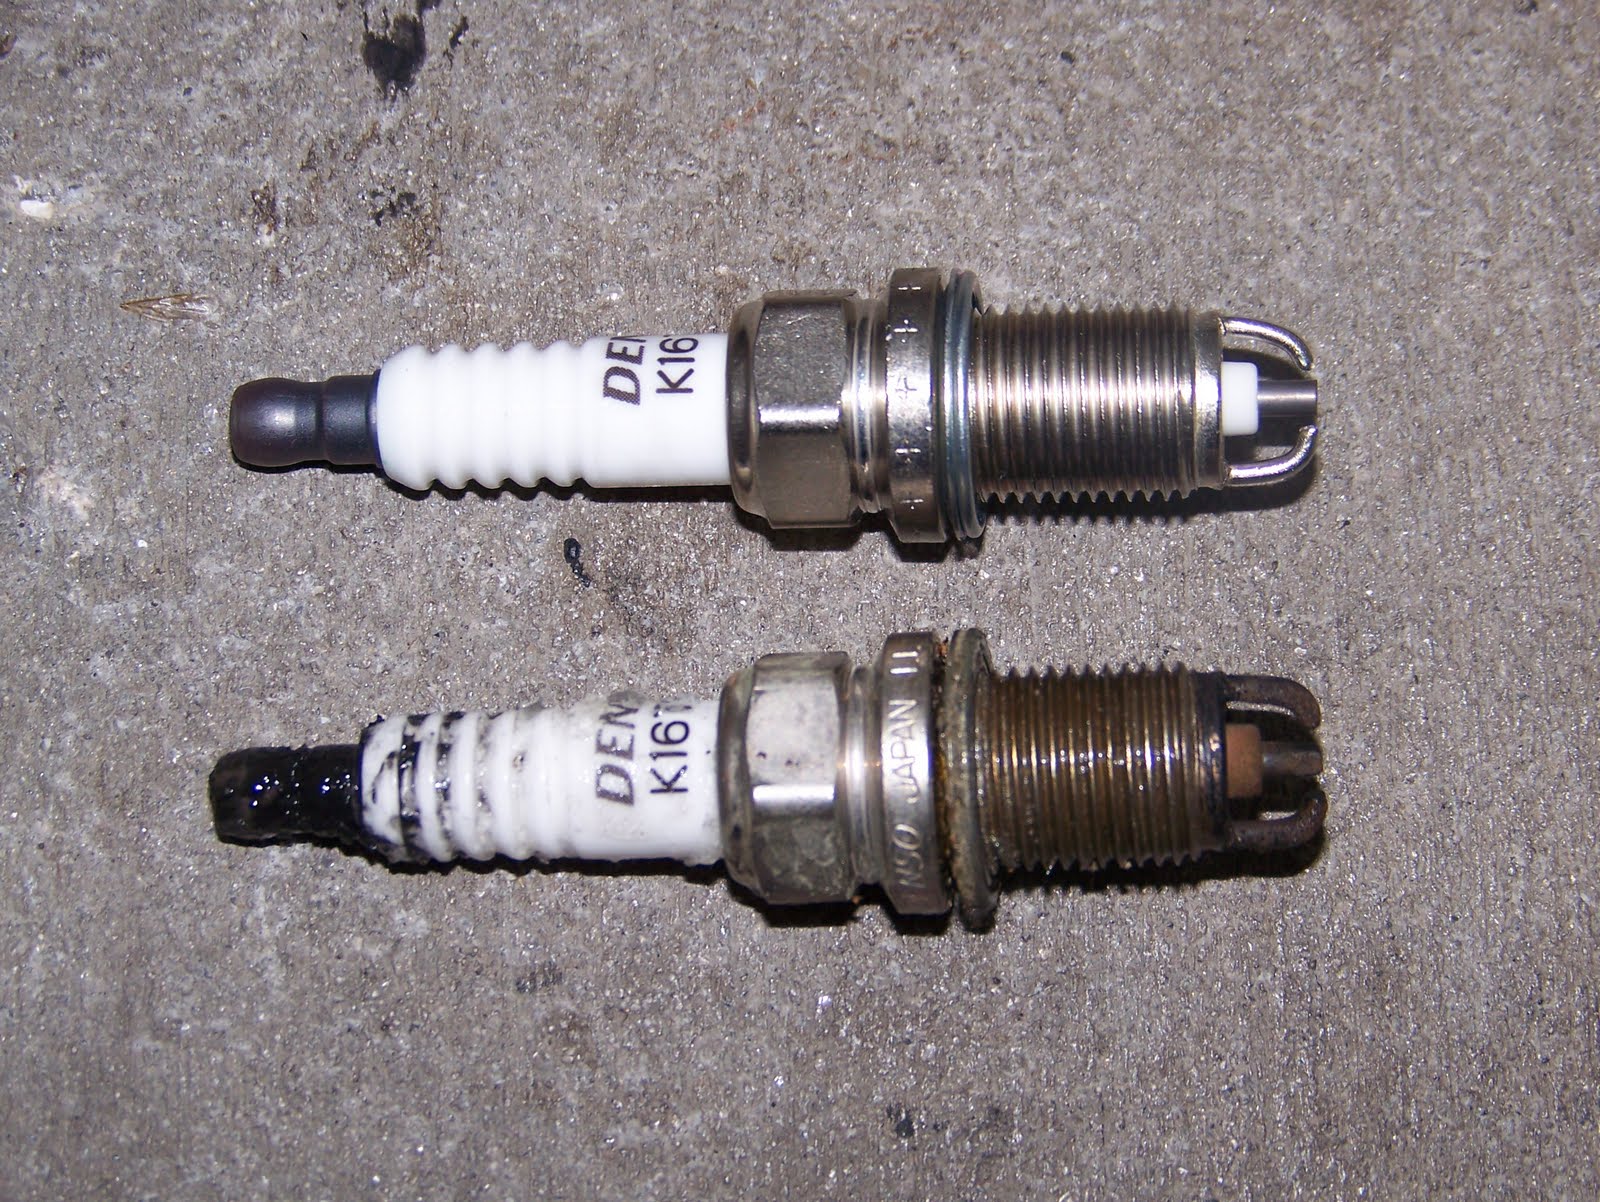 My OEM plugs are the double sided spark plug . Denso #3194 . Some places you have to order them as in my case . Some people have their own preference . This is mine and what my corolla calls for .
 Then I gap them at .44 each side .
 Then I applied some anti seize because the corolla heads are aluminum and the spark plug is metal . If you don't apply this they will be a pain to get out . Once I applied the anti seize then I put the plugs back . Hand screw first so that you don't strip the threads .
 The with the dielectric grease you put some inside the spark plug wires so that it will make it easier to pull the wires on and off with out breaking them .
 Since this car doesn't have a distributor and coil packs . Inspect the coil packs lube as well with dielectric grease .
 In this case I have a aftermarket air filter . This air filter can be cleaned a reused . It's very simple you spray some degreaser all over the filter and let it sit for awhile . Then with a hose you spray from the inside out to remove all the dirt and grease . Do this as many times as needed . When you are done then you shake it dry or if you have a air hose you can use that to help it dry quicker . Set it out in the sun while you do other things and come back to it then spray the either transmission fluid or the oil spray that comes with it . Then you let it sit for awhile . This prevents it from rusting .
 Next step is changing your oil . With your ratchet you remove your oil pan bolt . Make sure you have a oil pan underneath it . Let the oil drain for as long as you can , You want to make sure all your old oil is out . I do not use any oil cleaner additive but if you want to then you do what is best for you .
 With that then you remove your oil filter make sure you have a oil pan underneath that cause oil will come over around the filter .
 Then when you are ready to put your new filter back you wipe up the area where the old filter was then with your finger tip you apply a light coat of oil around the rubber ring of the oil filter . Then you hand tighten the filter . As the car runs it will tighten up more .
 Then when you are done you add your new oil , check all your fluids , put your air filter back . Start your engine let it run then shut it down and look for any leaks . Check your oil fluid again . Then you have completed your tune up .


