Showing posts with label alternator. Show all posts

Wednesday, September 3, 2014

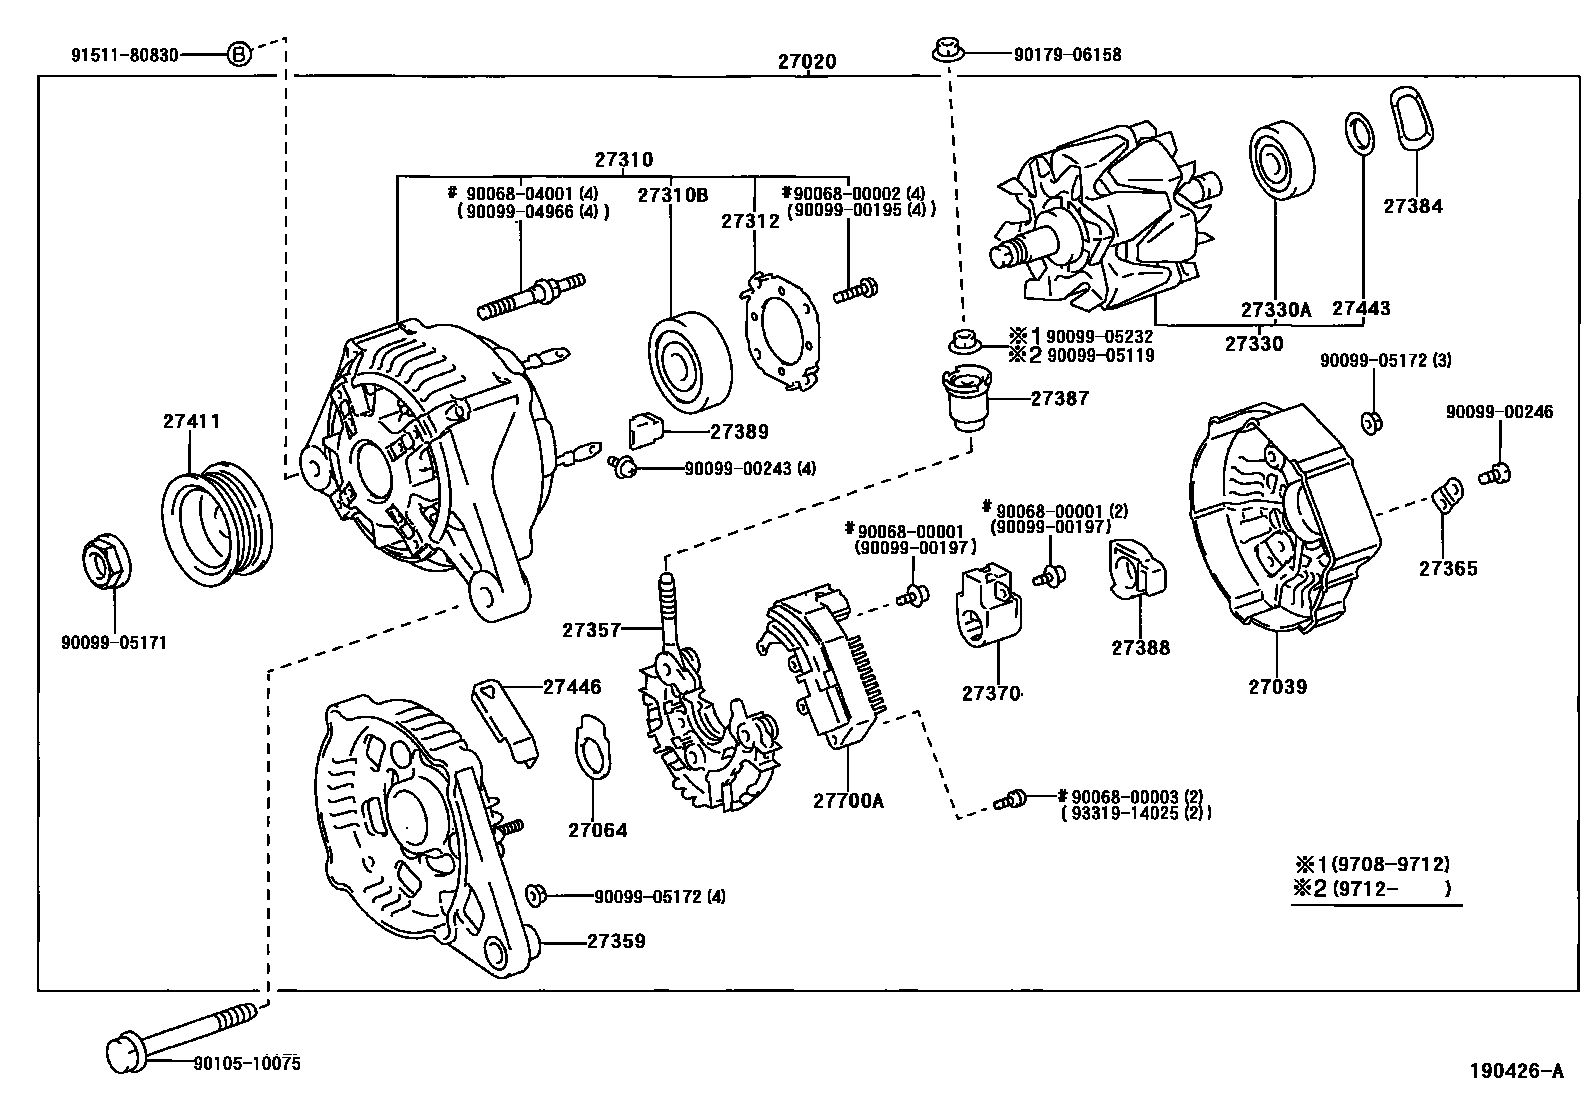
1999 Toyota Corolla VE 1ZZFE Engine Alternator Exploded Diagram


Exploded Diagram and Parts Name of 1999 Toyota Corolla Alternator for VE Trim Corolla Powered by 1ZZFE engine mated with a Manual Transmission, model code ZZE110:
27020. ALTERNATOR ASSY
27039. COVER, ALTERNATOR REAR END
27064. SEAL, ALTERNATOR PLATE
27310. FRAME ASSY, DRIVE END, ALTERNATOR
27310B. BEARING(FOR ALTERNATOR DRIVE END FRAME)
27312. PLATE, RETAINER
27330. ROTOR ASSY, ALTERNATOR
27330A. BEARING(FOR ALTERNATOR ROTOR)
27357. HOLDER, ALTERNATOR, W/RECTIFIER
27359. FRAME, ALTERNATOR RECTIFIER END
27365. PLATE, TERMINAL
27370. HOLDER ASSY, ALTERNATOR BRUSH
27384. WASHER
27387. INSULATOR, TERMINAL
27388. COVER, ALTERNATOR BRUSH
27389. INSULATOR, TERMINAL
27411. PULLEY, ALTERNATOR
27443. COVER, ALTERNATOR BEARING
27446. CLIP, ALTERNATOR CORD
27700A. REGULATOR ASSY, GENERATOR
Monday, January 21, 2013

DIY Corolla 93 - 97 Alternator Replacement

This is a DIY on replacing your alternator on a Corolla .
 
 
The first thing you do before working on anything electrical on your car is remove the positive side of the battery .


Then you remove the top nut and then you have to remove the cover underneath your car and then you loosen the bottom nut that is screwed into the adjuster block . You don't want to remove that bolt until you loosen the the alternator from up top or else the block will turn freely .


Then with the adjuster bolt you loosen the alternator until you can remove the belt .


It was easier to remove the windshield washer container so the top bolt could slide out .


You can see the adjuster screw and block once the alternator was removed .


Make sure you match up the alternators cause there are two types for this year vehicle . Before leaving the store have them test the new one . It is not common that sometimes the new ones are not working .


Then you put everything back the same way you removed the alternator , Make sure you adjust your alternator belt then after that you can connect your battery .

Make sure your battery is fully charged before you connect it , A half or dead battery can damage your new alternator . because you will be making it work harder and sometimes a surge will slip through .

.

For More info - www.corollacarclub.proboards.com


.

Monday, October 8, 2012

DIY - Tercel 91 - 94 Alternator Replacement

This is a DIY for a 1993 Toyota Tercel .
 

First anytime you work on anything electrical on any vehicle you disconnect the battery on newer cars they sell a plug that goes into your lighter to keep your ECM from resetting itself on older vehicles you don't have to worry about that .


 The first thing I did was remove the plug and the wire from the alternator , then I loosen up the bracket bolt where it holds the oil dip then I went I took off the bolt that screws into the alternator .


 Then you go underneath the vehicle and remove the bottom bolt going through the alternator . Once you have that remove the lightly tap the alternator free with out dropping it on your face .


Now this Tercel carries 3 types of alternators , 60amp Without Cold Climate package , 70amp Without Cold Climate package and another one With Cold Climate package . On this particular Tercel it has the heat shield that you have to remove from the old one before you turn it in for a core charge and place it on your new one . Keep all the screws .
 
I use dielectric for the plug and the anti seize for the bolts to keep them from going bad .


Then you reverse everything and then you adjust your alternator belt to where it isn't to tight or to loose . Enough to where you can twist it from side to side .

Warning when putting a new alternator make sure you battery is fully charged or new or else you will burn out the new alternator and you will void your warranty on your alternator .

More info on www.CorollaCarClub.proboards.com

Tuesday, July 20, 2010

DIY AE86: INCREASING ALTERNATOR AMPS

I currently ran into an issue with my 1986 AE86. The alternators are set OEM specs to hold 60amps and have been an issue thruout the years of ownership and they can't keep you battery charged by mearely using your headlights, lead along AC, power windows, Sound systems with 500+ watts, etc.

And when you get the ones from local auto parts, they last short periods of time or fail within the first month or 2. ALso, there are nearly ZERO shops willing to modify your alternators affraid you will burn up your rides and then suit them for it.

Well, here's an idea that works for any pre-1990 Corolla GTS or FX16 fitted with 4AGE engines...
The 1984-87 alternators were 60AMPS
1988-89 alternators were 70AMPS
1990-91 alternators were 80AMPS

THEY ALL FIT EACH OTHER WITH NO MODIFICATIONS REQUIRED (may be except for the 4AGZE)...so, you can simply order the 1991 Corolla GTS alternator and there you have it!!

Can you see the ONLY Difference between the 2 pictures below? (Main post casing)
On your left is a 1991 Corolla GTS (4AGE engine) 80APMS Alternator...on your right a 1984-87 Corolla GTS (4AGE engine) 60APMS Alternator.


This may verywell be the same with other Rides that although their bodies/engines may have changed, their engines may still be using the same alternator housing/connections/brackets, but internally, they are capable of more AMPS and that will solve your issue with adding accessories to your rides and not affecting your charging system.

Do your own search on other rides and Good luck!