Showing posts with label installing. Show all posts

Sunday, September 2, 2018

DIY - Draw-Tite Trailer Hitch Installation Toyota 2009 Rav4

This DIY is for a 2009 Toyota Rav4 Trailer Hitch 


Today is only for the hitch I have another video of the trailer hitch wiring .

Remove hitch from box and make sure it is for your vehicle . 


On the drivers side of the vehicle will be your tow hook and on the passenger side of your vehicle will be 2 open slots where muffler is located .


When removing the bolts make sure you keep the tow hook cause you will need to reinstall it again .

Then you will soapy the rubber isolators for your muffler , Carefully slide the hooks out then use something to hold the pipe up in the air while you install the hitch .


Once side will have 3 bolts and the other side will have two , Make sure knobby side of the washer is grasping the hitch as in photo . That will keep your bolts from backing out . 


Make sure you put the hook back on the drivers side torque bolts , Put rubber isolator back for muffler pipe and you are finished .

Your hitch will come with a paper to tell you how much torque is needed on the bolts . 


This doesn't mean I can pull anything I want but I bought a highest class that can be install on this vehicle . 

This is a Draw-Tite Tube Trailer Hitch .

Max Gross Trailer Weight 4500 LB

Max Gross Tongue Weight 675 LB


More DIY at www.corollacarclub.proboards.com 


.
Tuesday, August 14, 2018

DIY - Installing LED Yellow Fog Light Bulbs 2009 Toyota Rav4

This is a DIY on how to replace and upgrade your fog lights on a Toyota Rav4 2009


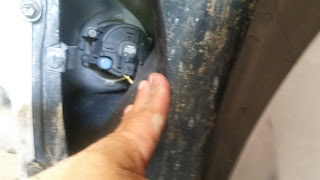
Real simple all you have to do is turn the wheel the opposite direction that you are gonna install the bulb .

Pull the splash guard toward you there might be a plastic clip you have to remove . Once you have it pull in then you can see and locate the bulb socket .

Always make sure you have the correct bulb .


Once both sides are done then you can test out the bulbs .


More DIY @ www.corollacarclub.proboards.com 


.

DIY - Installing Door Window Vent Visors 2009 Toyota Rav4

This is a DIY on how to install window vent visors on a 2009 Toyota Rav4 


First thing you do is to let the window vent visors lay flat in the sun for at least a hour so that it can be more flexible , Activate the glue cause once you install it and do not put it in the sun the plastic will form and the glue will get reactivated and possibly fall off or shape funny .

You clean the door frame with alcohol to remove and grease or dirt . 


Make sure before you peel the tape that you properly fit the vent visor to make sure it is correct and to know where you will be putting it on . 

Peel strip then press with your finger if you can do it out of the sun , continue pressing area for a few days especially when it is in the sun to make sure the glue sticks real good . 


More DIY @ www.corollacarclub.proboards.com 


.

DIY - Installing LED Reverse Light , Rear Side Marker & Tag Light Bulb 2009 Toyota Rav4

This DIY is how to upgrade you standard bulbs to a LED bulbs for your reverse lights and tag lights on a 2009 Toyota Rav4 


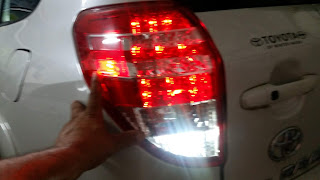
This is real simple with a flat head screwdriver you remove the tag light assembly from the left and pull down replacing your bulb and putting in the LED bulb . 


Now on this one the only bulbs you can replace in this lens is the reverse bulb , turn signal bulb and side marker .

That is because the brake light bulbs are factory LED so if one of those blows out you have to replace the brake light assembly . 

You pop to door open where the jack is located and on the passenger side you will se a door as well to . By slipping your small hand inside you can locate the bulbs and replace them to a upgraded LED bulb . 


More DIY @ www.corollacarclub.proboards.com 


.

DIY - Installing a Dashboard Mat 2009 Toyota Rav4

This is a DIY on how to put a dashboard mat which will prevent the sun from cracking your dashboard when vehicle sits outside .

Before installing this make sure mat is flat by either placing books on it and to prevent it from shrinking lay it in the sun for about a hour . 

Best investment especially if you resale the vehicle you can take this off and dash will look as good as new . 

If you already have cracks and want that ugly look to go away then yes you can install this for cover .


You do not have to use all the Velcro but with rubbing alcohol only smug areas that you will be strategically placing on your dash so that the mat will stick .  


Then gently pressing the mat to the dash making the Velcro stick . 


More DIY @ www.corollacarclub.proboards.com 


.