Showing posts with label electrical. Show all posts

Friday, June 22, 2018

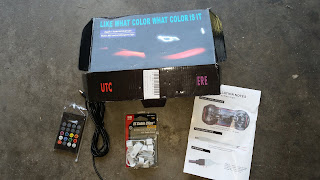
DIY - Installation Remote LED Under Car Tube Strip Modification

This DIY is going on a 2005 Corolla , But this can be done to any type of vehicle ;


I went to Lowes and bought these EZ cable clips . They easily bend around the strip without breaking any led .


Remove the kick panels on both sides and pull the rug back towards the seat .


There are two drain plugs on each side of the car , Slice a nice slit in the center of the pug so the wire can slip through there easily . 


Center the main box in this case it is a remote control . I put it under the center console I ran the  passenger side wires one to the front and to the passenger side , Now on the driver side I ran the wire going to the back and to the driver side .


I always paint underneath the car white , This is so that when the light bounces from the ground and shoots back up to the under body of the car it will reflect back down brighter . You will see I position the clips so that when a lowered car scratches the ground it will not rub on the light or wires . 


The reason you go down the driver side of the vehicle to the rear is cause the muffler is on the other side and it is hard to hide the wire from the heat . 


Now on the passenger side I ran the wire under the splash guard where it covers the fender and you can see where I put the clips .


Now with the wire being so thin the night before I set all the clips and added some silicone to seal and hold the wire from separating - I drilled a hole in the extra glove box on the driver side . 


I found the closest bolt to use for a ground spot .


Now locating the fuse box which is by the steering wheel underneath , This is where I'm getting my power from by using the washer fluid fuse . This will make the lights shut off when key is turned off . This is only temporarily until I get a farad . I don't trust myself yet with the switch or remote control . But in the future this will go to a power that will let me leave the light on without the key . 


Which the switch connected and hiding the remote wire under the carpet .


You will see where I'm pointing is the remote eye so when I use the remote it is visible but yet hidden - The mini glove box makes a good spot to hide the switch and the remote . 


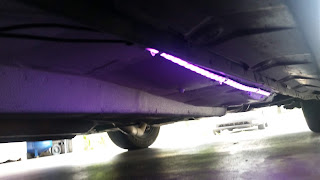
Now with silicone I cover up the slit so that no water can come back in under the rug . You can see how the purple just bounces off the white painted under body area . 


This is a 7 color LED but in this photo purple is what I chosen - 


.


More DIY @www.corollacarclub.proboards.com


.

Wednesday, April 25, 2018

DIY - Troubleshooting Rear Back Up Lights Not Working 2005 Toyota Corolla

This DIY is for ANY 9nth Generation Corolla 

When you have checked the bulbs and the wires in the elbow of the trunk .

I don't know why mine was missing a piece but as I did for the trunk light I traced my rear back up light wire to this opened end box . 


You have to pull down the driver side carpet to find this junction of wires .


As you can see the 3 wires are connected to get the both back up lights to work . 

The bottom 2 wires are for the trunk light which I do have another DIY on it . 


These are many angles of how it should look - I don't know what was missing but if I go to a junk yard I will look for this piece . 


More DIY @ www.corollacarclub.proboards.com 


.

Wednesday, June 28, 2017

DIY - 2000 Infiniti I30 Front & Rear Motor Mounts Replacement

This is a DIY for a 2000 Infiniti I30 front and rear ELECTRONIC motor mounts .


Get the vehicle as high as you can and use jack stands . I never done this on this type of vehicle so I put two jack on each end of the motor so it doesn't drop because I will be removing the whole middle sub frame .


This is really easy and the access to the top center bolts are easy to get to . Once you remove the top center bolt on the front and rear mount . 


Make sure you unplug the motor mounts in this photo I already had my air filter box off because the rear mount wire runs under the starter and yes there are clips along the route .

The front one is easy all you have to do is unplug it from the top .


Now you remove the three bolts in the front of the sub frame then the two in the rear of the sub frame but be careful this will drop .


Now on this vehicle it has electronic motor mounts that if you do not put the same you will have vibration in the motor and your service engine soon light will be on . There is a reason for this wires .

Make sure wires face out driver side . In my case I cleaned the oil from the sub frame . 


When you put it back you can put the mounts on the center first then raise the sub frame then bolt to sub frame or if you keep the mounts on the frame put the center bolts first then bolt in the sub frame . Either way is fine . 

Once you are finished plug in the motor mounts .

This is the easiest motor mount replacement . Other then that wire under the starter and removing the air filter box that is all .


.