Showing posts with label maxima. Show all posts

Wednesday, June 1, 2016

DIY - 2002 Infiniti I30 Left & Right Engine Splash Shields

This is a simple DIY I only had to do the driver side but I bought both sides - This is for a 2000 Infiniti I30 and this is very important to have cause your A/C unit and other parts will not get wet as you hit puddles and the water would splash on the parts then in the future rusting them sooner and soaking the belts making them squeal in the rain .

Yes they can be a pain in the ass to take on a off for oil change but if you can see you can slightly pull away from the oil filter and then remove it . 

There are other splash guards underneath this vehicle make sure you order the correct one this one is for the sides behind the wheel covering axle sides .


Basically it is a bunch of clips that hold the parts - You can use clips or bolts which ever fits you .


More DIY at www.corollacarclub.proboards.com


.

Friday, October 9, 2015

DIY 2000 Infiniti I30 Clock Bulb Replacement

This DIY is for a 2000 Infiniti I30 Clock Bulb Replacement 


To get to the clock you have to pull then vent out and on the left and right of the top you will see two screws to remove and then the whole top piece that the clock is connected to will come out .


It is easier if you remove the clock from the top part to get to the one side of the bulb 


This is a special bulb either called a T2 or the OEM number is 27545-1W600 - These bulbs will fit the heater control panel as well - Gently twist with a Phillips screw driver just a tiny bit and the bulb will come out - When you put the new ones in be gentle cause you can damage the plastic on the back then it will be a pain in the butt to put back - You only need to turn just a tiny bit - With your finger make sure bulb is secure before reassemble or connect to make sure it is working


Once you are done then you can put it all back - I don't know why my camera made it look almost purple but the bulbs do have a blue tip on them and they do shine a bright white 


More DIY - www.COROLLACARCLUB.proboards.com 


.

Monday, October 5, 2015

DIY - Radio Installation 2000 Infiniti I30

This is for a 2000 Infiniti I30 with a Bose system 


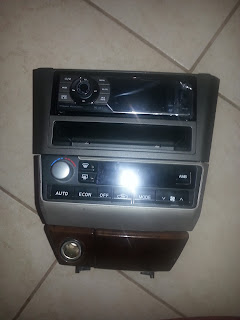
Remove the vent first with a flat head screw driver - Then you can remove the bottom plate where the shift selector is - Then you will see 2 screws on top and the other two screws under the ashtray - Then carefully unplug the stereo 


Now with the radio installation kit for single or double din - You will need to make sure that you remove the A/C switch and the ashtray - The radio screws WILL NOT come out - You have to put the new stereo and the A/C switch and ashtray on the new bracket - Once you put it all together you will see how easy it is to do 


Make sure you get the correct wire kit - On my vehicle I didn't need anything special other then the RCA male jack ends - You must connect the antenna and you must put the two blue wires to a hot wire to turn the amp on that the Bose system has in the trunk - This stereo is a DVD player that plays videos to I had to ground the wire to keep the TV in while driving - Again I did notice if the antenna is NOT connected during testing the stereo will not come on - The blue wire has to be connected to the power line as well for the rear speakers to work - Once you are done then you can reinstall the stereo 


More DIY @ www.corollacarclub.proboards.com 


.

Tuesday, September 22, 2015

DIY - Replace Cabin Air Filter 2000 Infiniti I30

This is a DIY on how to replace your cabin air filter on a Infiniti I30 


A lot of people might not realize but the I30 does have a cabin air filter behind the glove compartment box - It is real easy to get to - Remove the 4 screws on top and the entire compartment box will drop - Note you cannot get to the filter by just pulling the door down because there is a wall - You must remove the entire piece .


You will see the door to the cabin air filter - You must remove the clip on the bottom of the door then slide door upward then towards you 


You will see two filters side by side - Remove the top one first then the bottom one will slide - Remember filter has handles and they must face outward 


Once you remove the filters make sure you look inside for any trash that can be blocking your drain whole - If you need a coat hanger to move the debris then do that - Then with the vacuum cleaner there is a attachment that has a long skinny end - Be careful when you slide it in the opening because you DO NOT WANT TO DAMAGE THE HEATER CORE OR BEND THE HEATER CORE FINS - Once you have that area cleaned then put the new filters in remembering the same procedure when putting it back together .


More DIY - www.COROLLACARCLUB.proboards.com 


.

Sunday, September 6, 2015

DIY Replacing Spark Plugs 2000 Infiniti I30

This is a DIY for a Infiniti I30 with a 3.0 Nissan Motor - You DO NOT have to remove the hood but when I did this DIY I was replacing my hood with a new one .


The front plugs are the easiest , All you have to do is remove the single bolt holding the ignition coil - When pulling the coil up use slight twist and pull - Make sure you inspect your coil tips for oil - If you see signs of oil then you need to replace your valve cover and grommets 


I gap my plugs at .44 and use some anti seize - electrical lube - This motor does use double platinum plug


Now the rear plugs are easy to remove - All you have to do is remove the top part of the gas and transmission cable bracket - Again check the coils for oil on the tips - But when you put these plugs back MAKE SURE YOU HAVE PLENTY OF ROOM BECAUSE YOU CAN CRACK THE BACK SIDE PLUGS - when tightening plug do it slow and keep the extension straight -  MAKE SURE WHEN YOU DO THIS IT IS SILENCE AS POSSIBLE SO THAT YOU CAN HEAR IF YOU HAVE CRACKED THE PLUG - IF YOU HEAR ANY WEIRD SOUND WHILE TIGHTENING REMOVE THE PLUG TO MAKE SURE - THERE SHOULD BE NO SOUNDS WHEN TIGHTENING THESE PLUGS - Once you done all of then then you can put the coils back on 


more diy @ www.corollacarclub.proboards.com 


.