Showing posts with label spark plugs. Show all posts

Sunday, September 10, 2017

DIY Spark Plug Replacement 2005 Toyota Corolla S

This is a DIY for a 9th gen Corolla 1zz Motor         


These plugs DO NOT have to be gapped but it is good to check it out .40

The top photo shows OEM plugs for 1zz or 2zz motor 


Remove the engine top cover 


You will have to remove the rail for the coil packs - then you can remove the coils in order by either marking them or laying them down in order -  You can mix the coils up but why 


Always check your spark plugs to see if they are running correctly - Make sure you purchased the right one either Denso or NGK all others NOT RECOMMENDED  


By using Dielectric ad Anti Seize to ensure for future replacements it can be easier .


for more information - www.COROLLACARCLUB.proboards.com 


.

Sunday, June 5, 2016

DIY Replacing Spark Plug & Valve Cover Gasket 2002 Honda CR-V

This DIY is for a 2002 Honda CR-V on how to replace the valve cover gasket and spark plugs 


Remove the cover plates that cover the coil packs and the fuel rail - Then remove the intake air box - You will see on the side of the valve cover there are two hoses that carry the coolant through a tube make sure you remove those two hoses 


Then you can remove the ignition coil packs that are above the spark plugs - Then you need to disconnect the Vtec module - Then you need to remove the cruise control and the upper strut bar - Once all those are removed or placed out of the way then you can start unbolting the nuts that hold the cover down 


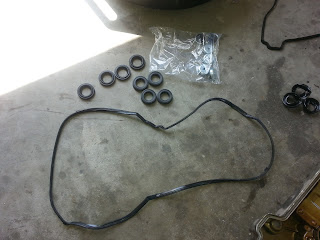
Once you have the cover removed then you can replace the spark plug tube seals by gently using a screw driver and pushing downward - Plus while you have the valve cover off you can easily remove and replace the spark plugs


Part number for the valve cover gasket set is VS50614R make sure you match up the spark plug tube seals cause two different types come in the package - Once you have chosen the correct ones then gently with a rubber mallet put the new ones on 


Again while your in there you might as well do your spark plugs make sure you check the gap should be .044 and use the OEM iridium plugs - NGK part number is 6994


Once you put the new plugs in clean the valve cover from oil or sand and then just do the process backwards - Make sure you use brake cleaner before putting the valve cover back on so when it seals there is no oil deposits and it will seal - once you have it on clean the area with brake cleaner that way if you have any other leaks you can find them 


More DIY @ www.corollacarclub.proboards.com 


.


Sunday, September 6, 2015

DIY Replacing Spark Plugs 2000 Infiniti I30

This is a DIY for a Infiniti I30 with a 3.0 Nissan Motor - You DO NOT have to remove the hood but when I did this DIY I was replacing my hood with a new one .


The front plugs are the easiest , All you have to do is remove the single bolt holding the ignition coil - When pulling the coil up use slight twist and pull - Make sure you inspect your coil tips for oil - If you see signs of oil then you need to replace your valve cover and grommets 


I gap my plugs at .44 and use some anti seize - electrical lube - This motor does use double platinum plug


Now the rear plugs are easy to remove - All you have to do is remove the top part of the gas and transmission cable bracket - Again check the coils for oil on the tips - But when you put these plugs back MAKE SURE YOU HAVE PLENTY OF ROOM BECAUSE YOU CAN CRACK THE BACK SIDE PLUGS - when tightening plug do it slow and keep the extension straight -  MAKE SURE WHEN YOU DO THIS IT IS SILENCE AS POSSIBLE SO THAT YOU CAN HEAR IF YOU HAVE CRACKED THE PLUG - IF YOU HEAR ANY WEIRD SOUND WHILE TIGHTENING REMOVE THE PLUG TO MAKE SURE - THERE SHOULD BE NO SOUNDS WHEN TIGHTENING THESE PLUGS - Once you done all of then then you can put the coils back on 


more diy @ www.corollacarclub.proboards.com 


.

Friday, October 19, 2012

DIY - Tercel 91 - 94 Oil Change & Tune Up


This DIY is on a 1993 Toyota Tercel with a 1.5L FI SOHC 4cyl , 3E - E .


 This is a basic oil change , You drain your oil pan , remove the oil filter , Because this vehicle has alot of miles I did a 10w 40 oil change and added STP . Its your car you can put either OEM or what is good for you .


Make sure you wipe the area before putting back your new oil filter and put a light coat of oil on the rubber part on the oil filter hand tighten then add oil .


This is the Tune up .


Before removing your distributor cap there is the intake hose to your air filter cause it will make it easier . Its your car so if you don't or do either way .


Now on this vehicle the plugs & cap are one piece . I'm sure they sell them separate but I bought them as one . When you put your rotor button back I added some anti seize .


Then once you replaced your cap & rotor you can remove the front of the cold intake hose so you can gave easy access to the spark plugs .


Make sure you put anti seize on the thread of all your plugs , gap your plugs . They say your plugs are pre gap but its your car on whether you trust them or not .


The plastic holder for the wires broke so I added a tie strap so that the wires don't fall on the heat shield of the exhaust , Plus I took off the plastic heat shield for the wire that is the farthest so that the heat doesn't soften of melt the wire .


Once you have your plugs back together then you can change your PCV valve .


And last you can replace your air filter .
 
 
Once you are finished you start your car and listen for misfires . If all sounds well then you have completed the most easiest tune up and oil change .
 
 
More information or help you can contact me at www.CorollaCarClub.proboards.com or http://rinconrolla98.blogspot.com