Showing posts with label 2.4 motor. Show all posts

Sunday, June 5, 2016

DIY Replacing Spark Plug & Valve Cover Gasket 2002 Honda CR-V

This DIY is for a 2002 Honda CR-V on how to replace the valve cover gasket and spark plugs 


Remove the cover plates that cover the coil packs and the fuel rail - Then remove the intake air box - You will see on the side of the valve cover there are two hoses that carry the coolant through a tube make sure you remove those two hoses 


Then you can remove the ignition coil packs that are above the spark plugs - Then you need to disconnect the Vtec module - Then you need to remove the cruise control and the upper strut bar - Once all those are removed or placed out of the way then you can start unbolting the nuts that hold the cover down 


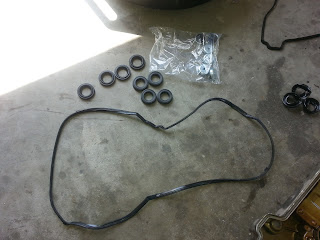
Once you have the cover removed then you can replace the spark plug tube seals by gently using a screw driver and pushing downward - Plus while you have the valve cover off you can easily remove and replace the spark plugs


Part number for the valve cover gasket set is VS50614R make sure you match up the spark plug tube seals cause two different types come in the package - Once you have chosen the correct ones then gently with a rubber mallet put the new ones on 


Again while your in there you might as well do your spark plugs make sure you check the gap should be .044 and use the OEM iridium plugs - NGK part number is 6994


Once you put the new plugs in clean the valve cover from oil or sand and then just do the process backwards - Make sure you use brake cleaner before putting the valve cover back on so when it seals there is no oil deposits and it will seal - once you have it on clean the area with brake cleaner that way if you have any other leaks you can find them 


More DIY @ www.corollacarclub.proboards.com 


.


DIY Replacing Oil Pressure Switch 2002 Honda CR-V

This DIY is for a 2002 Honda CR-V with a 2.4 motor 


This part is located above the oil filter and below the Vtec solenoid - These usually leak and people usually think it might be the valve cover  


Passenger side fender well has a opening for easy access - Once you put the new one on clean the area with brake cleaner so you if you have any other leaks they can be easily be found


More DIY @ www.corollacarclub.proboards.com 


.

DIY Replacing PCV Valve 2002 Honda Truck CR-V

This is a DIY on a 2000 Honda CR-V with a 2.4 motor 


This is real simple but a tight location for this pcv valve - You will see above the alternator and under the power steering pump it's really hard to see but you will see the hose that has a clamp - 


All you have to do is unbolt the part and put the new one - If the old one doesn't rattle that means it was clogged - Testing the new one make sure it rattles - If the old one rattles that means it was ok but still if you have 100,000 miles on the car or more and never changed it then why not 


More DIY @ www.corollacarclub.proboards.com 


,

Wednesday, February 3, 2016

DIY Replace Radiator Over Flow Tank 2000 Toyota Camry


This is a DIY on how to replace your coolant over flow tank on a 2000 Toyota Camry 


In this DIY I'm using the OEM part - There are two bolts holding this to the inside of the fender 


Make sure you use the bracket from the old over flow tank and then you put it back the same way you took it off - fill with coolant and your back to normal 


More DIY @ www.COROLLACARCLUB.proboards.com 


.

Wednesday, October 14, 2015

DIY - Serpentine Belt 2000 Honda CRV

This DIY is on a 2000 Honda CRV with a 2.4 Motor - The Diagram below is correct route for the serpentine 


Remove the cover below that covers the a/c and crankshaft - As you see in the second photo that is where the location of the belt tensioner - All you have to do is unclasp the power steering canister and move it aside 


With my homemade serpentine belt tool you pull the tensioner forward and you will see the belt getting loose - From that point you un slip the top part of the belt 


Once you have the serpentine belt off the top you can pull it from the bottom - Make sure you measure the new one before you put it on - Check tensioner pulley to make sure it still has tension - Remember the route of the belt if not this page provides a diagram 


Then you put the new belt on the same way you took it off - Make sure the grooves are matching and laying flat - Feel the tension - Then put the cover and power steering pump canister back 


More DIY @ www.COROLLACARCLUB.proboards.com


.


Monday, June 1, 2015

DIY Rear Motor Mount 2000 Honda CRV

 This is a DIY on a rear motor mount for a 2000 Honda CRV 


 Its easier to remove the air intake on this DIY but you can do it with it on it 


Three bolts on the bottom and one in the center but I took it upon myself to remove the bracket since I had the car all opened up 


To remove the bracket you have two bolts on the top and one on the bottom


Once you are done then you just install it the same way you took it off 


More DIY www.COROLLACARCLUB.proboards.com 


,