Wednesday, October 14, 2015

DIY - Serpentine Belt 2000 Honda CRV

This DIY is on a 2000 Honda CRV with a 2.4 Motor - The Diagram below is correct route for the serpentine 


Remove the cover below that covers the a/c and crankshaft - As you see in the second photo that is where the location of the belt tensioner - All you have to do is unclasp the power steering canister and move it aside 


With my homemade serpentine belt tool you pull the tensioner forward and you will see the belt getting loose - From that point you un slip the top part of the belt 


Once you have the serpentine belt off the top you can pull it from the bottom - Make sure you measure the new one before you put it on - Check tensioner pulley to make sure it still has tension - Remember the route of the belt if not this page provides a diagram 


Then you put the new belt on the same way you took it off - Make sure the grooves are matching and laying flat - Feel the tension - Then put the cover and power steering pump canister back 


More DIY @ www.COROLLACARCLUB.proboards.com


.


DIY - Front Brakes & Rotors 2000 Honda CRV

This is a DIY for a 2000 Honda CRV Front Brakes with Slotted Rotors


To remove the calipers you need to unscrew the top and bottom bolt - Then you will see a tension spring that if you did not purchase the hardware kit you will be using these again - The reason it is called a tension spring cause this is what pushes your front pads back as the caliper opens - These are important to reinstall 

Then with a 17mm socket you remove the caliper bracket so that you can remove the front rotor 


On this vehicle you have two screws holding the rotors to the hub 


Make sure you have the lines facing forward or read the sticker driver side and passenger side face different ways 


Only on the bolts you need to apply anti seize 


This vehicle takes ceramic pads 


With the caliper tool push the calipers back then starting putting everything on the same way you took it off 

When putting the caliper back on you will have to squeeze the pads to the rotors because the spring tensioner will push the pads out until the caliper surrounds the pads - What I did was slip the bottom of the caliper first then leave a opening to put the spring tensioner for the top then slide the rest of the caliper 


There you have it 


More DIY @ www.COROLLACARCLUB.proboards.com 


.

Friday, October 9, 2015

DIY 2000 Infiniti I30 Clock Bulb Replacement

This DIY is for a 2000 Infiniti I30 Clock Bulb Replacement 


To get to the clock you have to pull then vent out and on the left and right of the top you will see two screws to remove and then the whole top piece that the clock is connected to will come out .


It is easier if you remove the clock from the top part to get to the one side of the bulb 


This is a special bulb either called a T2 or the OEM number is 27545-1W600 - These bulbs will fit the heater control panel as well - Gently twist with a Phillips screw driver just a tiny bit and the bulb will come out - When you put the new ones in be gentle cause you can damage the plastic on the back then it will be a pain in the butt to put back - You only need to turn just a tiny bit - With your finger make sure bulb is secure before reassemble or connect to make sure it is working


Once you are done then you can put it all back - I don't know why my camera made it look almost purple but the bulbs do have a blue tip on them and they do shine a bright white 


More DIY - www.COROLLACARCLUB.proboards.com 


.

Monday, October 5, 2015

DIY - Radio Installation 2000 Infiniti I30

This is for a 2000 Infiniti I30 with a Bose system 


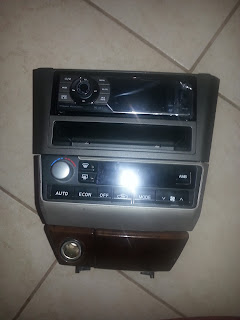
Remove the vent first with a flat head screw driver - Then you can remove the bottom plate where the shift selector is - Then you will see 2 screws on top and the other two screws under the ashtray - Then carefully unplug the stereo 


Now with the radio installation kit for single or double din - You will need to make sure that you remove the A/C switch and the ashtray - The radio screws WILL NOT come out - You have to put the new stereo and the A/C switch and ashtray on the new bracket - Once you put it all together you will see how easy it is to do 


Make sure you get the correct wire kit - On my vehicle I didn't need anything special other then the RCA male jack ends - You must connect the antenna and you must put the two blue wires to a hot wire to turn the amp on that the Bose system has in the trunk - This stereo is a DVD player that plays videos to I had to ground the wire to keep the TV in while driving - Again I did notice if the antenna is NOT connected during testing the stereo will not come on - The blue wire has to be connected to the power line as well for the rear speakers to work - Once you are done then you can reinstall the stereo 


More DIY @ www.corollacarclub.proboards.com 


.